Hot Sale for Chery Orinoco Timing Kit - BODY ACCESSORY RR VIEW MIRROR ASSY for CHERY QQ6 S21 – Qingzhi
Hot Sale for Chery Orinoco Timing Kit - BODY ACCESSORY RR VIEW MIRROR ASSY for CHERY QQ6 S21 – Qingzhi Detail:
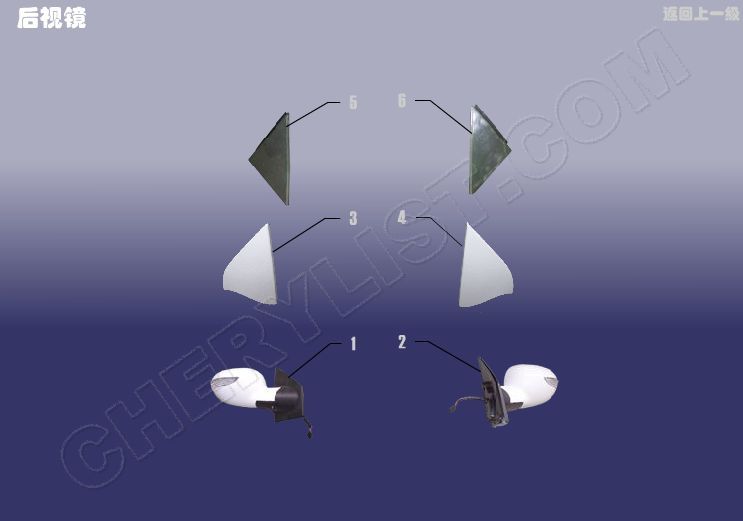
1 S21-8202020BA-DQ RR VIEW MIRROR ASSY-RH OTR POWER
2 S21-8202010BA-DQ RR VIEW MIRROR ASSY-LH OTR POWER
3 S21-8202040 TRIANGLE CORNER-RR VIEW MIRROR RH OTR
4 S21-8202030 TRIANGLE CORNER-RR VIEW MIRROR LH OTR
5 S21-5401012-DQ TRIANGLE CORNER-DOOR RH OTR
6 S21-5401011-DQ TRIANGLE CORNER-DOOR LH OTR
The best adjustment angle of the left rearview mirror is that the road environment in the mirror accounts for the majority, and the vehicle body only needs to display 1 / 4. The best adjustment angle of the right rearview mirror is also that the road environment in the mirror accounts for the majority. Because the right rearview mirror is far from the driver’s line of sight, the road extension point is located above the rearview mirror, and the vehicle body also displays 1 / 4. The interior rearview mirror only needs to be adjusted to the distant ground by hand The flat line is in the center of the mirror
How to adjust Chery rearview mirror
1. Enter the vehicle and observe whether the rear-view mirror angle is appropriate.
2. The mirror adjustment switch can be seen on the left side of the center console.
3. Press the rearview mirror switch “L” to adjust the angle of the left rearview mirror.
4. Press the mirror switch “R” to adjust the right mirror angle.
How to adjust Chery rearview mirror
1. First, manually adjust the rearview mirror lens down to the limit position. At this time, you can see the clamping position between the lens and the rearview mirror lens driver, and insert the slotted screwdriver into the clamping position. Note that there is a semicircular platform at the clamping position between the lens driver and the lens. Do not find the wrong position;
2. After inserting the slotted screwdriver, gently pry the opener backward, and the lens will be separated from the lens driver. If you still need to keep the lens, take care of the lens to avoid the lens falling and breaking;
3. Some lenses have electric heating function, and the heating harness head needs to be removed from the lens. At this time, the disassembly of the whole lens is completed;
4. The following is the installation of lenses. First, insert the hot wire beam head. The heating wire is regardless of positive and negative poles, and can be inserted at will. Pay attention to insert it in place to avoid falling off and causing failure of heating function;
Product detail pictures:
Related Product Guide:
We retain bettering and perfecting our merchandise and service. At the same time, we do the job actively to do research and improvement for Hot Sale for Chery Orinoco Timing Kit - BODY ACCESSORY RR VIEW MIRROR ASSY for CHERY QQ6 S21 – Qingzhi , The product will supply to all over the world, such as: Marseille , Hamburg , Nairobi , Our products have enjoyed a great reputation for their good quality, competitive prices and prompt shipment in international market. Presently, we are sincerely looking forward to cooperating with more overseas customers based on mutual benefits.
It is a very good, very rare business partners, looking forward to the next more perfect cooperation!
